Send download link to:
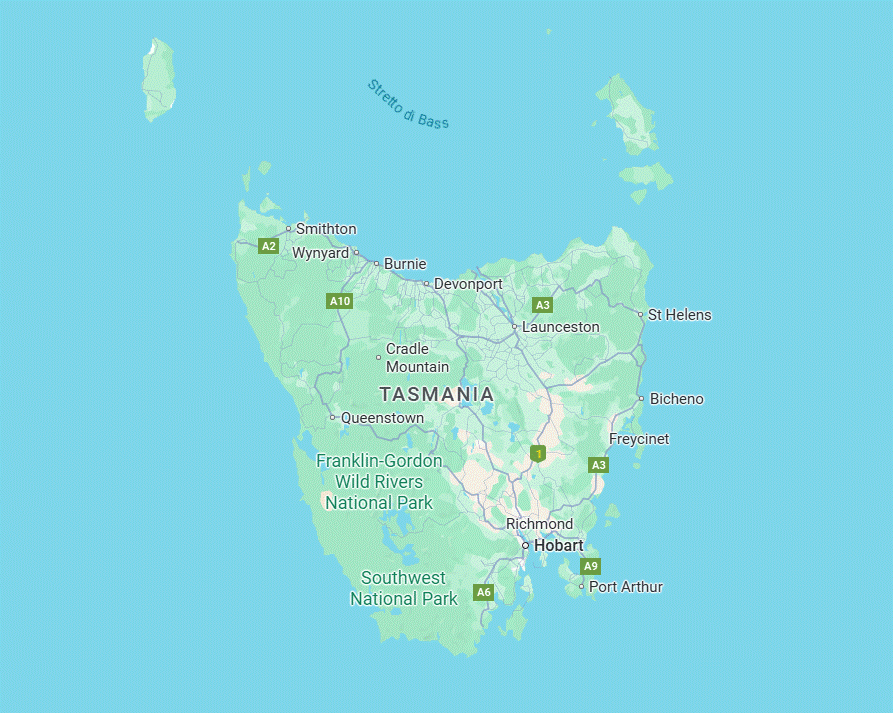
Tasmania West-Coast Warm-Up · Devonport → Strahan (via Sheffield & Cradle Mountain)
A first taste of “proper” Tasmania: dairy country and mural-lined streets, then into alpine air at Cradle Mountain, finishing with salty harbour light in Strahan.
Introduction
This opening Tappa is designed to feel like the island in miniature. You roll out of Devonport with the Bass Strait behind you and quickly turn inland to Sheffield — a small town that wears its history on the walls, quite literally. From there the road climbs into cooler, cleaner air as you aim for Cradle Mountain. The ride tightens and the scenery shifts: green pasture gives way to forest, then to open, high-country views where the weather can change its mind in minutes. A short detour to Dove Lake is the moment to slow down — the boatshed viewpoint is as iconic as it gets — before you drop back down through winding west-coast roads to Tullah, framed by water and dark hills. The final run into Strahan feels like arriving at the end of the map: a working harbour, low light on Macquarie Harbour, and the promise of wilderness cruises the next morning. Everything here is set up as waypoints so the POIs are part of the route, not an afterthought.
Stage 1 · Devonport → Strahan
Distance (verified)
~218 km total (sum of road-distance legs).
Devonport→Sheffield 25.9 km · Sheffield→Cradle Mountain 53.5 km · Cradle→Tullah 54.2 km · Tullah→Strahan 84.5 km
Ride time
~3.5–4.5 hrs moving time (plus stops).
Allow extra for Dove Lake access & short walks.
Road character
Fast links + twistier forest sections; all sealed.
Expect cooler temps around Cradle Mountain.
Best moments
Sheffield murals · Dove Lake · Strahan harbour sunset.
Early start helps beat the crowds at Dove Lake.
Interactive Map
POI/WP
Sheffield (Town of Murals) — an open-air gallery; perfect coffee stop and leg stretch.
Hotels (Strahan)
Strahan Village ★★★★
Risby Cove Boutique Hotel ★★★★
Franklin Manor ★★★★
Restaurants (Strahan)
Risby Cove Restaurant
GetYourGuide (near destination)
Strahan: Gordon River Cruise with Lunch & Sarah Island Walk
POI Photo Gallery (Stage 1)


Photo credits: images from Wikimedia Commons (see captions for authors and licenses). Used under CC BY-SA / public domain terms where applicable.
Stage 2 · Strahan → Derwent Bridge (via Queenstown & 99 Bends)
One of Tasmania’s most technical and rewarding rides: the Lyell Highway climbs out of the harbour and coils through rainforest, mining towns and endless switchbacks before opening into alpine lake country.
Introduction
Stage 2 is pure West Coast character. Leaving Strahan, the road quickly narrows and starts to rise, following rivers and dense forest towards Queenstown. The surface remains sealed throughout, but the rhythm changes constantly: short straights, tight corners and sudden elevation changes demand attention and reward smooth riding. Queenstown itself feels carved into the mountains — a natural pause before tackling the legendary 99 Bends section of the Lyell Highway. From here the landscape opens, the traffic thins, and the road flows toward the lakes and button-grass plains around Derwent Bridge. This is a stage to ride unhurried, stopping often: waterfalls, lookouts and the sheer scale of the terrain define the experience.
Stage 2 · Tech overview
Distance (verified)
~126–127 km total.
Strahan→Queenstown 40.8 km · Queenstown→Derwent Bridge 85.6 km (Nelson Falls is a brief off-highway stop on the Lyell Highway).
Ride time
~4–5 hrs moving time.
Frequent photo stops recommended.
Road character
Tight mountain bends, elevation changes, excellent tarmac.
Cooler and wetter than the coast.
Highlights
Queenstown · 99 Bends · Nelson Falls.
One of Tasmania’s iconic riding sections.
Interactive Map
Hotels (Derwent Bridge)
Lake St Clair Lodge ★★★★
Derwent Bridge Chalets ★★★
GetYourGuide
Lake St Clair National Park: Guided Nature Walk
POI Photo Gallery (Stage 2)
.jpg)


Photo credits: images from Wikimedia Commons (see captions for authors and licenses). Used under CC BY-SA / public domain terms where applicable.
Stage 3 · Derwent Bridge → Hobart (via Mount Field National Park)
A short but rich transition stage: alpine air, cool temperate rainforest, then a smooth approach into Hobart’s harbour streets.
Introduction
Stage 3 trades raw remoteness for texture and contrast. Leaving Derwent Bridge, the road runs south through open highland scenery before tightening as it approaches Mount Field National Park. Russell Falls is not just a stop, but a waypoint — a pause that defines the day. From Mount Field, the descent towards Hobart feels almost ceremonial: valleys widen, the air warms, and the Derwent River guides you into the historic sandstone streets of Salamanca Place.
Stage 3 · Tech overview
Distance (verified)
~183 km total.
Derwent Bridge → Russell Falls 110.9 km · Russell Falls → Hobart 72 km
Ride time
~3–3.5 hrs moving time.
Add time for the Russell Falls walk.
Road character
Flowing sealed roads, shaded forest sections.
Wildlife likely early morning and late afternoon.
Highlights
Mount Field NP · Russell Falls · Hobart waterfront.
A calm, scenic approach to the capital.
Interactive Map
Hotels (Hobart)
MACq 01 Hotel ★★★★★
The Henry Jones Art Hotel ★★★★★
Restaurants (Hobart)
Dier Makr
GetYourGuide (Hobart)
Hobart: Explore MONA Like a Rockstar
POI Photo Gallery (Stage 3)


Photo credits: images from Wikimedia Commons (see captions for authors and licenses). Used under CC BY-SA / public domain terms where applicable.
Stage 4 · Hobart → Bruny Island → Alonnah
A ferry-linked stage that feels like a reset: dune lookouts, long beaches, then the far-southern lighthouse road before settling into Alonnah.
Introduction
Stage 4 is built around three “must-stop” Bruny waypoints stitched directly into the route. The Neck gives you the classic isthmus panorama, Adventure Bay adds a soft, open coastline, and Cape Bruny Lighthouse delivers that end-of-the-world feeling before you roll back north to Alonnah. Treat the ferry as part of the rhythm: arrive early, breathe, and let the island pace take over.
Stage 4 · Tech overview
Distance (verified)
~122 km total.
Hobart→The Neck 60.1 km · The Neck→Adventure Bay 16.9 km · Adventure Bay→Cape Bruny 20.1 km · Cape Bruny→Alonnah 25.0 km
Ride time
~3–4 hrs moving time + ferry time.
Add stops for lookout steps and beach walks.
Road character
Easy sealed cruising with occasional rougher island sections.
Ride to conditions; wildlife is common.
Highlights
The Neck · Adventure Bay · Cape Bruny Lighthouse.
Big views without big kilometres.
Interactive Map
Hotels (Bruny Island / Alonnah base)
Adventure Bay Retreat Bruny Island ★★★★
Bruny Boathouse ★★★★★
Captain Cook Holiday Park ★★★
Bruny Island Escapes and Hotel Bruny ★★★
Restaurants (bookable online)
Hotel Bruny (Dining)
GetYourGuide (geographic match)
Bruny Island Day Tour (from Hobart)
POI Photo Gallery (Stage 4)


.jpg)
Photo credits: images from Wikimedia Commons (see captions for authors and licenses). Used under CC BY-SA / public domain terms where applicable.
Stage 5 · Alonnah → Hobart (loop closes)
A tidy finish with a ferry rhythm: roll north to Roberts Point, hop across to Kettering, then climb to kunanyi / Mt Wellington for the last wide-angle view before dropping into Salamanca.
Introduction
This final stage is deliberately clean and satisfying. You leave Bruny behind via the Roberts Point ferry, then thread the d’Entrecasteaux Channel back to Hobart. Before the loop closes, add the kunanyi / Mt Wellington climb: a fast shift from island calm to alpine air, with a summit panorama that makes the whole route feel “complete”.
Stage 5 · Tech overview
Distance (verified)
~109 km riding + ferry.
Alonnah→Roberts Point 35.8 km · Kettering→Hobart 32.7 km · Salamanca↔kunanyi summit 40.2 km (20.1 km each way)
Ferry
~15 mins crossing (typical)
Roberts Point ↔ Kettering (vehicle ferry).
Road character
Easy coastal approach, then a sharp city-to-summit climb.
Summit weather can change quickly—take a layer.
Highlights
Ferry moment · kunanyi lookout · Salamanca finish.
A final “big view” without big kilometres.
Interactive Map
Hotels (destination: Hobart)
MACq 01 Hotel ★★★★★
The Henry Jones Art Hotel ★★★★★
Restaurants (bookable online)
GetYourGuide (geographic match)
Hobart: kunanyi/Mt Wellington Explorer Bus Pass
POI Photo Gallery (Stage 5)


Photo credits: images from Wikimedia Commons (see captions for authors and licenses). Used under CC BY-SA / public domain terms where applicable.
Stage 6 · Hobart → Campbell Town
A clean Midlands run on the Heritage Highway, chaining Tasmania’s most iconic sandstone stops as true routing waypoints.
Introduction
Leaving Hobart, the road opens quickly into the wide pastoral centre of Tasmania. This stage is deliberately unhurried: rather than pushing north, it stitches together a sequence of heritage landmarks that sit naturally on your line. Richmond gives you the first pause — the famous sandstone bridge and riverside calm — before the highway settles into that long, steady Midlands rhythm.
Oatlands’ Callington Mill rises as a proper landmark you can navigate by, then Ross delivers the details: carved stonework, quiet lanes, and a tidy stop before the final roll into Campbell Town. It’s a logical overnight split for the return to Devonport, keeping tomorrow balanced and scenic.
Distance (by waypoint segments): Hobart→Richmond 24 km · Richmond→Oatlands 56 km · Oatlands→Ross 36 km · Ross→Campbell Town 12 km · Total ~128 km.
Stage 6 · Tech overview
Distance
~128 km
Verified via waypoint segments (see above).
Road surface
All-tarmac
A1 + short heritage connectors.
Ride time
~2h moving
Plus heritage stops.
Overnight
Campbell Town
Balanced split for the final return north.
Interactive Map
WP & POIs (used as route waypoints)
WP2 · Callington Mill (Oatlands) (POI)
Restored windmill landmark on the Heritage Highway.
WP4 · Campbell Town (Finish / Overnight)
End of Stage 6 — overnight split before Devonport.
Restaurants (online booking only)
The Ross Hotel · Table bookings
If you stop in Ross, this is the cleanest online table booking option.
The Church Tasmania (Campbell Town) · Online order
Pre-order picnic/grazing boxes — ideal if you arrive late.
Hotels (Booking.com property pages only)
★★★★ Ivy on Glenelg
Central Campbell Town base; good for an easy in/out overnight.
★★★★★ The Church at Haven on High
Heritage character stay; strong “Tasmania history” feel for the overnight.
★★★★★ The Cottage at Haven on High
Self-contained cottage option; practical and quiet for a one-night stop.
POI Photo Gallery (Stage 6)

Bracteantha · CC BY-SA 4.0 · via Wikimedia Commons

Thennicke · CC BY-SA 4.0 · via Wikimedia Commons

Gary Houston · CC0 1.0 · via Wikimedia Commons
Photo credits: images from Wikimedia Commons (see captions for authors and licenses). Used under CC BY-SA / public domain terms where applicable.